Became more convenient about,
- Visibility(color display, tilt mechnism)
- Trasability(Memory measurement date, time at same time measurement)
- Easy operation(remote control from PC)
Main features:
- Easily set up the measurement parameter from PC
- Easily search a memory data using the date.
- Not necessary to charge a battery.
- Can check the parameter while the measurement.
Specifications:
| Model | NDI-800CN | NDI-80CN |
| Range> | 2.0 ~ 800.0 cN・m (0.020 ~ 8.000 N・m) |
0.020 ~ 80.00cN・m (2.0~800.0mN・m) |
| Accuracy | ±0.5% (499 digits or less ±3 digits) | |
| Display | 4 figures digital display | |
| Measurement direction | CW-CCW | |
| Meaurement mode | Peak hold(PP) / Peak down(PD) / Real time output(C) / Track(TR) | |
| Acceptance judgement | Judge OK or NG by a setting value. | |
| Statistics information | Calculate an average, maximum and minimum value by the selected date. | |
| Real time output | 250 data / 1 second | |
| Memory daat | 400 data(with measurement date, mode and judgement) | |
| Clock | Store the measurement date. | |
| Power | AC adaptor (DC.12V) / AA battery | |
| Socket size | 20 / 9.5 | |
| Accessories | (measurement joint) OW-025, OW-10 | (measurement joint) OW-20, OW-60 |
| Cube with screw holes of M2.6, M3, M4, M5 and M6 | ||
| AC adaptor(input : AC100~240V (50/60Hz)、output : DC12V) | ||
| USB cable (mini B type) | ||
| AA size cell×4 | ||
| Result of calibration, Certification on calibration, Traceability system figure | ||
| Carrying case | ||
| Specification | Type | ||||
| OW-025 | OW-10 | OW-20 | OW-60 | ||
| Measuring range N・m | 0.25 | 1 | 2 | 6 | |
| Mechanical life (times) | 10,000 | 8,000 | 5,000 | 5,000 | |
| Outer diameter size (mm) |
Bit engagement part (screw part) |
M2.6 cross recess screw |
M3 cross recess screw |
M4 cross recess screw |
M6 cross recess screw |
| The standard screw is cross recess screw
but they may be altered as necessary |
|||||
| Outside diameter | φ28 | φ32 | φ32 | φ38 | |
| Height | 44 | 51 | 51 | 69 | |
| Installation | 20square ×4(t) | ||||
Specifications:
| Specification | DI-9M-8 | DI-9M-08 | |
| Measuring range | 0.020-8 N・m | 2.0-800 mN・m | |
|
0.20~80 kgf・cm |
0.020~8 kgf・cm | ||
| 0.20~70 lbf・in | 0.020~7 lbf・in | ||
| Accuracy | ±0.5% (499 digit or less ±3digit) | ||
| Display | The 4 figures digital display of LCD | ||
| The measurement direction | CW-CCW (right and left) | ||
| Zero return by one touch | Return to zero by pressing clear button. | ||
| Measurement Mode |
Track , P-P(peak to peak) , P-D(Peak-Down) , C(Real-time Output) |
||
|
High and low limits judging function |
High and low value are measurement within the limits, and can be set up. |
||
| Real-time Output |
Load torque value is outputted every about1/ 180 second. |
||
| The Maximum, the minimum, and the average value display |
The maximum, the minimum value, and average value of the saved data |
||
| Data Output | ASCII format (baud rate 19200) | ||
| Auto power save | 10 minutes no use, automatically switch off. | ||
| Power supply | Ni-Cd chargeable battery 1.2V × 5cells 700mAh | ||
| Charging time | About 3hours | ||
| Continuous working time | About 12hours | ||
| clearance | It is a display clearance in set-up time. (0.1 - 3.0 sec) | ||
| Socket size | 20mm/ 9.5mm> | ||
| Dimension / Weight | W:160×D:125×H:55 / About 1kg | ||
| Recommend buffer accessories | Measuring joint OW-20/OW-60 |
Measuring joint OW-025/OW-10 |
|
| Cube (with a 5th page screw hole) 20x20x20 (M2.6/M3/M4/M5/M6 Tap processing) |
|||
| AC/DC adaptor | |||
| Carrying case | |||
| An inspection report, a proofreading certificate, a traceability system figure | |||
| Specification | Type | ||||
| OW-025 | OW-10 | OW-20 | OW-60 | ||
| Measuring range N・m | 0.25 | 1 | 2 | 6 | |
| Mechanical life (times) | 10,000 | 8,000 | 5,000 | 5,000 | |
| Outer diameter size (mm) |
Bit engagement part (screw part) |
M2.6 cross recess screw |
M3 cross recess screw |
M4 cross recess screw |
M6 cross recess screw |
| The standard screw is cross recess screw
but they may be altered as necessary |
|||||
| Outside diameter | φ28 | φ32 | φ32 | φ38 | |
| Height | 44 | 51 | 51 | 69 | |
| Installation | 20square ×4(t) | ||||
Everyday check of an electric driver can be performed.
Since various information is displayed on a display board, it is very intelligible.
The change of a measurement unit can be performed.
Memory data is 800 affairs.
Real-time output Every about 1 / 180 seconds
The taking-in software of data can download from a homepage.
Specifications:
| Specification | CD-100M | CD-10M | ||
| Measuring range (at the time of Track) |
0.10~10 N・m | 0.010~1 N・m | ||
| 1.0~100 kgf・cm | 0.10~10 kgf・cm | |||
| 1.0~90 lbf・in | 0.10~9 lbf・in | |||
| Accuracy | ±0.5%(199 or less digit±1digit) | |||
| Display | The 3.5 figures digital display of LCD | |||
| The measurement direction | CW-CCW (right and left) | |||
| Measurement Mode | Track , P-P(peak to peak) , P-D(Peak-Down) , C(Real-time Output) | |||
| High and low limits judging function | High and low value are measurement within the limits, and can be set up. | |||
| Real-time Output | Load torque value is outputted every about1/ 180 second. | |||
| The Maximum, the minimum, and the average value display | The maximum, the minimum value, and average value of the saved data | |||
| Automatic Clearance | Automatically clear the displayed value after certain time (0.5 - 3.0 sec,selectable at each 0.5 sec). Setting 0.0 sec for manual Zero clearance |
|||
| One-touch zero | A clear button is pushed and it is a zero. Data is outputed. | |||
| Data output | ASCII format (baud rate 19200) | |||
| Power supply | Ni-Cd chargeable battery 1.2V×5cells 700mAh | |||
| Auto power save | 10 minutes no use, automatically switch off. | |||
| Charging time | About 3 hours | |||
| Continunous working time | About 12 hours | |||
| Socket fit mouth | 20mm/ 9.5mm | |||
| Weight | Abbreviation 1 kg | |||
| Outside dimension | 160(W)×125(D)×55(H) | |||
| Attachment | Measurement joint SJ50/SJ10K | Measurement joint SJ10 | ||
|
Accessories |
AC/DC adaptor | |||
| Carrying case | ||||
| An inspection report, a proofreading certificate, traceability system figure | ||||
| SJ50 | SJ10 | About an adapter <measurement joint SJ(PAT.P)> |
 |
 |
It does not decompose, even if it rewinds
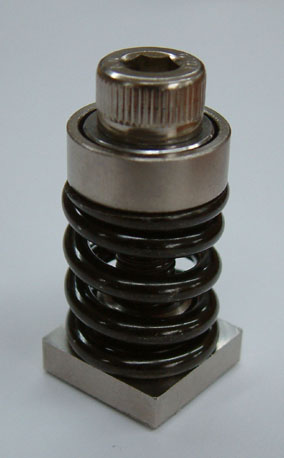
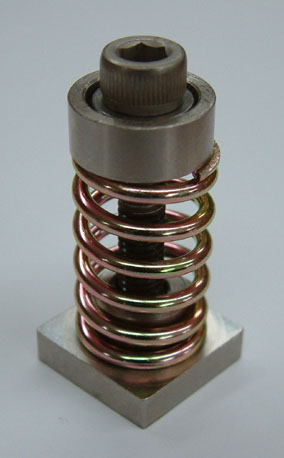
joint too much <Since the adapter attached is the coil spring compression system of the conventional system, you can use it by the conventional management method. Moreover, this adapter is special structure. It does not decompose, even if it rewinds joint too much. You can use it in comfort. |
Feature:
Everyday check of an electric driver can be performed.
Since various information is displayed on a display board, it is very intelligible.
The change of a measurement unit can be performed.
Memory data is 800 affairs.
Real-time output Every about 1 / 180 seconds
The taking-in software of data can download from a homepage.
Specifications:
| Specification | DI-11 | |||
| Measuring range (at the time of Track) |
0.10~20 N・m | |||
| 1.0~200 kgf・cm | ||||
| 1.0~174 lbf・in | ||||
| Accuracy | ±0.5%(499 or less digit±3digit) | |||
| Display | The 4 figures digital display of LED | |||
| The measurement direction | CW-CCW (right and left) | |||
| Measuring mode |
P-P Peak | Peak load value hold | ||
| T-R Track | Indication of real time torque value. | |||
| P-D Peak down | Holding Load Value at the moment to change from upward to downword | |||
| C(Real-time Output) | Load torque value is outputted every about 1/ 180 second. | |||
| clearance | It is a display clearance in set-up time. (0.1 - 3.0 sec) | |||
| Data output | ASCII Format (baud rate 19200) | |||
| Auto power save | 10 minutes no use, automatically switch off. | |||
| Charging time | From empty - less than 6hours | |||
| Continunous working time | 12 hours | |||
| Weight | About 1.5kg | |||
| Outside dimension | 130(W)×180(D)×34(H) | |||
| Attachment | Measurement joint SJ-50 / SJ-100 | |||
|
Accessories |
AC/DC adaptor (Please choose AC adaptor out of 120V, and 230V.) | |||
| Exclusive receipt case | ||||
| An inspection report, a proofreading certificate, traceability system figure |
||||
